You’ve probably heard about HTML5 and the ability to embed video. Well this sounds all well and good but its been a bit of a mission getting my head around it and finally getting to a point where it actually works. I first started looking into it about 2 months ago when creating videos for the new Tribe website. Me and Ben (the web developer there) spent quite a bit of time scratching our heads and testing different methods until we came up with a solution that should work across all platforms.
In this tutorial I’ll try my best to explain the process of getting HTML5 video to embed into a WordPress Blog, you’re not limited to a WP blog, you should be able to adapt it for any type of site. Bear in mind I don’t have a great deal of knowledge in the web area, so I apologise now if this is a little sloppy.
Remember only HTML5 supported browsers can view the video, this currently includes the latest versions of Chrome, IE9, Firefox4, Safari, Opera and most mobile devices such as the iPhone, iPad etc.
Okay there’s a few things you’ll need to get for this to work:
Step 1 – Converting The Video
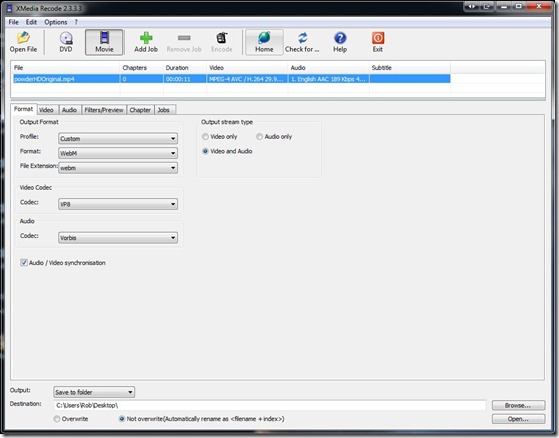
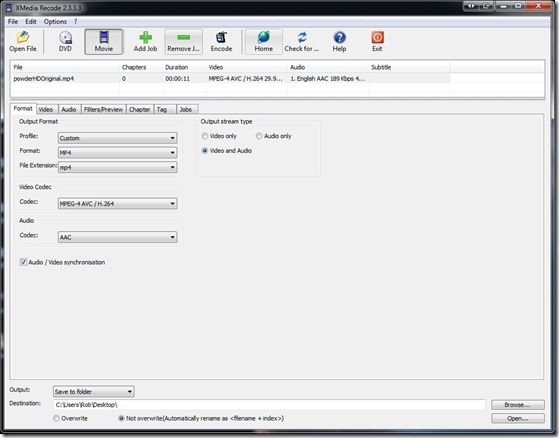
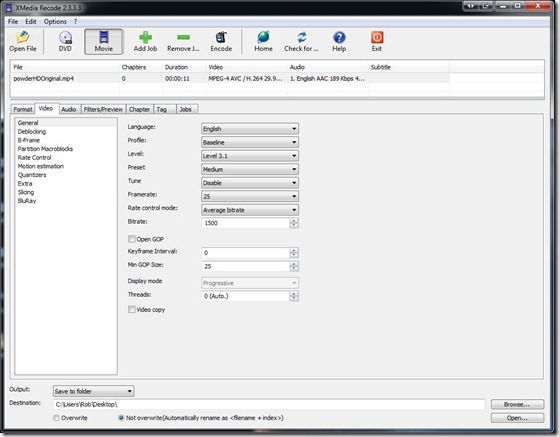
To get the video to play across multiple platforms you need to convert your original file in to two formats, the new and open source WebM which is supported by Chrome, Firefox4 and Opera also a H.264 MP4 file that’s supported by safari, IE9, mobile devices and will be used by Flowplayer if the browser does not support HTML5 (IE8 and below for example)
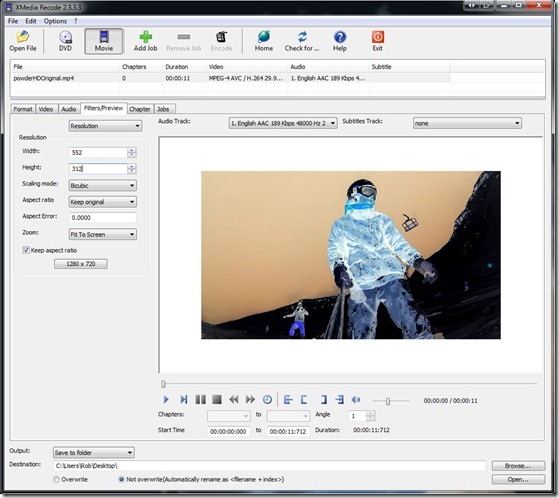
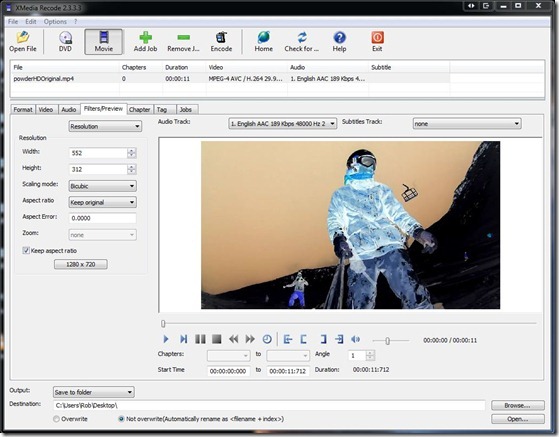
All the content on my blog is 555 pixels wide, for some reason you cannot enter this figure into the program, so I leave it at the nearest available option: ‘552×312’
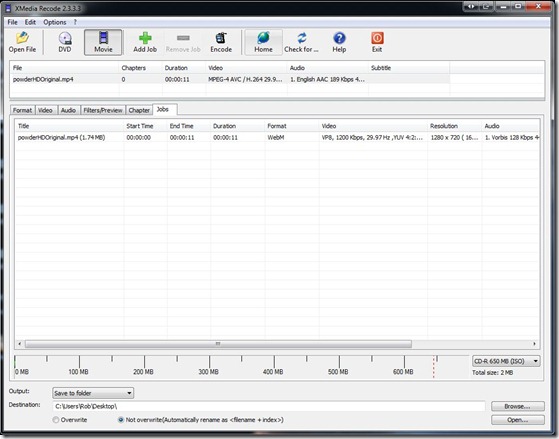
The great thing about this program is its ability to batch process easily, So if you have a few files that need converting you can just keep importing them and adding them to the list.
Its important that these are correct, I have found if they are left as default then the video wont play on iPhones.
Again make sure that you change the video resolu
tion in the ‘Filters/Preview’ tab.. if you need to that is. Also worth noting that you should make sure the ‘Keep aspect ratio’ check box is selected when changing the size.
Step 2 – Setting up your site
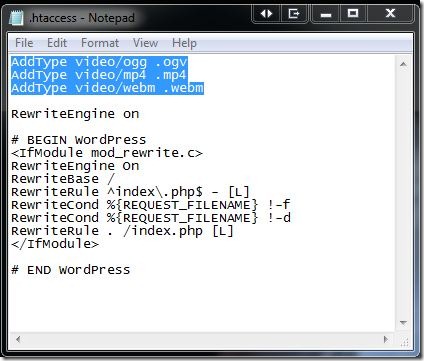
I came across a problem when testing the video out in different browsers. Firefox4 could not display it for some reason. After some time and frustration I finally worked out it must be something to do with the settings on my server and not a codec issue. Ben showed me that the ‘.htaccess’ folder hosted on my server needed updating so the WebM format could be recognised by some browsers. I have to be honest I’m not entirely sure why or how but this solution works..
AddType video/ogg .ogv
AddType video/mp4 .mp4
AddType video/webm .webm
Note that the .ogv file is probably unnecessary now that firefox4 supports WebM.
Now your site is ready to play the video content.
Step 3 – Uploading the video
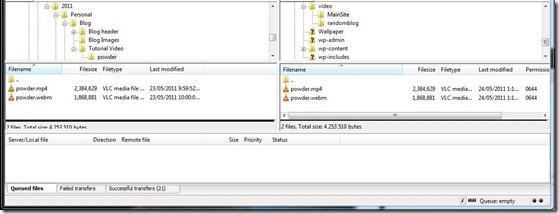
Now that the site is ready you need to upload your video.
Step 4 – Embedding the video.
So now you’re finally ready to embed the video!
If you want purely HTML5 video playing on your site then the code below will do just that. If you want to support more browsers by including a fall-back flash player, read the rest of section then follow the instructions in step 5.
<video id="movie" width="552" height="312" preload controls autoplay="autoplay">
<source src="http://www.digitalanthill.com/video/randomblog/powder.mp4" type=’video/mp4; codecs="avc1.42E01E, mp4a.40.2"’ />
<source src="http://www.digitalanthill.com/video/randomblog/powder.webm" type=’video/webm; codecs="vp8, vorbis"’ />
</video>
Key:
The above code is the most efficient way (I’ve found) of getting a video to embed into your site. As long as you replace the bold areas with you own requirements it should work.
You can (and probably should) take it one step further by adding flash support in there too. This will allow browsers that don’t support HTML5 to resort back to a native flash player.
The following instructions will show you how to do just that.
Step 5 – Enable Flash
Download Flowplayer (free) and copy the ‘flowplayer’ folder to the ‘public_html’ folder on your server.
Next you need to add the following to your header:
<script src="http://www.digitalanthill.com/flowplayer/example/flowplayer-3.2.6.min.js"></script>
In this example I’ve added it just above the </head> tag. Remember to replace the url with a link to flowplayer-3.2.6.min.js on your own site.
The grey highlighted code below is the same as the above HTML5 embed. The orange highlighted area is what you need to add to the grey code to get the flash flowplayer working.
<video id="movie" width="552" height="312" preload controls autoplay="autoplay">
<source src="http://www.digitalanthill.com/video/randomblog/powder.mp4" type=’video/mp4; codecs="avc1.42E01E, mp4a.40.2"’ />
<source src="http://www.digitalanthill.com/video/randomblog/powder.webm" type=’video/webm; codecs="vp8, vorbis"’ />
<object width="552" height="312" type="application/x-shockwave-flash" data="http://www.digitalanthill.com/flowplayer/flowplayer-3.2.7.swf">
<param name="movie" value="http://www.digitalanthill.com/flowplayer/flowplayer-3.2.7.swf" />
<param name="allowfullscreen" value="true" />
<param name="flashvars" value=’config={ "clip" : { "url" : "http://www.digitalanthill.com/video/randomblog/powder.mp4", "autoPlay" : true, "autoBuffering" : true } }’ />
</object>
</video>
Again remember to change the bold text with links to your own content hosted on your site. If you use the links I’ve provided it will probably work but if I were to change the locations of the files your embeds will break.
Well I hope this tutorial is some help to someone. If you spot anything wrong with this post, come across any problems or you just want to say hello, leave a comment below.
Good luck 🙂
p.s. If you want to learn more about the above process check out this site: http://diveintohtml5.org/video.html
The clip used was taken from this video.



The .htaccess file is just an apache (the web server) configuration file. When you set up your web server, you need to tell it what kind of files it can serve (.php, .pl etc). In this case your just telling the web server to serve up those media files when needed.
This can be done in two places, the global configuration file (called httpd.conf) or on a folder by folder basis in a .htaccess file. In this case, you’ve presumably put it in the root directory so it covers the whole site.