Drift from mustardcuffins on Vimeo.
I came across the following video the other week and was amazed by the effect mustardcuffins had created. I spent a long time trying to think how it was done.
I was producing some work for a project when I came across the pixel motion frame blending option in After Effects. I realized that this is what gave this stop motion that awesome smooth blending transition effect.
The next day I went out and took some photos to see if I could recreate that effect.
All these shots were taken with the Nikon D90 and the 18-107mm kit lens.
First test. Not quite as smooth mustards but its nearly there.
I found that the subject you focus on needs to be quite big other wise it can look a bit odd for example the lamp post in the following clip.
I thought I would also see what happens if the camera doesn’t move. It gives quite a nice effect on the train carriages.
I realized nearly all of mustardcuffins shots had a central focal point. In the tower block example above that point is the corner of the building. I took a photo every three steps or so making sure that the centre of the image was lined up with that point on the tower.
Here’s how I then created the effect using After Effects I’m not sure if this is how he does it but it does produce similar results:
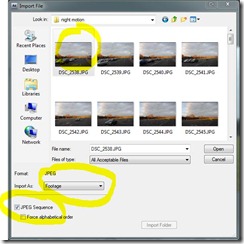
File>Import>File – select the first image of the sequence
Make sure Jpeg sequence is selected then click Open.
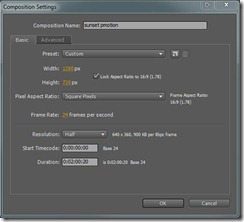
Right click in the project tab and select New Composition.
Give the new Composition a name. I’ve set it up as 720p with 24fps, of course you can change this to what you want. Click ok
Drag your image sequence into the timeline. Depending on the resolution of your camera you may need to scale the image down a bit.
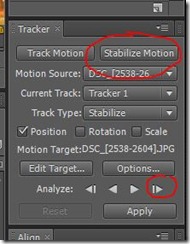
I found that if the image sequence is played how it is at the moment there is some movement between frames. To fix this I used the stabilize motion feature.
Click Stabilize Motion (if this window isn’t there go to Window>Tracker). This will bring up a track point on your video. Zoom right in to the centre point of the video and drag the centre of the tracker to that point. Then click the Analyze 1 Frame Forward button if the tracker doesn’t stick to the same point move it manually to the correct position. I found that the automatic tracking doesn’t really work all that well with stop motion video the quickest way I could do it was to press the page down button and then move the tracker manually into position.
Once you have tracked the entire sequence click the apply button. If you play the video now you’ll notice that it has smoothed out the movement.
Now select the motion blend tool. click the box twice until it is a solid diagonal line appears. This is the pixel blending option (what gives it that warping effect) I think this is only available in the later versions of AE.
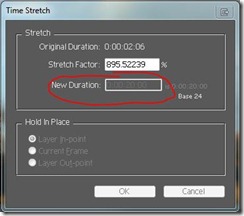
If you play the video now it will be far to fast. So right click the video in the time line and select Time>Time Stretch. The time you set the new duration depends on how many frames the current clip is. For this example the original clip was about 2 seconds and I increased it to 20 (just experiment with the times).
You can preview the video by clicking the Ram preview button. It might be an idea to turn the quality down while doing this because it can take a long time to create a preview.
Once you are happy with the results render out the movie
. Composition>Make Movie then select the compression settings you want then hit Render. That’s it.
I will be creating some more of my own videos based on this technique soon.
If you have any questions just post a comment ill try and answer it if i can..


Thanks for the tutorial! I’ve never used After Effects, but it’s brilliant that you reverse-engineered the process. Bravo! 🙂
No problem 🙂 hope its some use.
I got all the steps but I dont know how to get the blur animation! I just have the sequences but how I can activate the motion blur because that makes the video kind of special!
And what can I do when there is a sequence missing and a red green blue window appears in my video?
Thanks
What version of AE are you using? that particular effect is only in the latest version I think cs3 and cs4…
as for the missing frames.. when you’re importing your sequence tick the box that says ‘force alphabetical order’ see if that makes a difference.
I use cs3 on a mac
Hi, thanks for the tutorial. This is the video I’ve made:
http://vimeo.com/10549864
It’s not as perfect as it should be but I think that the technique is the one used in “Drift”, just with better shooting and tracking.
Hey dude, thanks a bunch for the tutorial, I followed the instructions and made a quite peculiar vid ^^
Check it out if you like. http://vimeo.com/10888169
No Problem, Glad you found it useful!
great post as usual!
Great!!
I love your work and the effort you took to explain
thanks!!!
Thank you! Glad u like it 🙂
Just noticed this tutorial Rob! Nice one! I’ll give it shot soon. 🙂
ha wicked! Yeah I need to do more of this soon!
Hello Rob! I’ve been trying to do a morphing time lapse with the timewarp tool on AE CS5, which includes the pixel motion effect, with no positive results…is there anything different to be done? thanks in advance!
Hey! I,m not sure with Cs5 as I haven’t installed it yet! When I do Ill let you know if the process has changed. What seems to be the problem?
Hey Rob, i do everything in the tutorial but it turns out like a slide show with no motion blur, I defiantly have pixel motion on. Also am using CS5.5? Thanks
Hi, when I come to do the ‘time stretch’ bit it just seems to cut my sequence really short – what am I doing wrong? thanks x
Thanks for this. I haven’t experienced any problems in running the tutorial and found it very useful. In fact the results were great and I’ll definitely be using this technique in the future. I was impressed by how professional the end product looked and how easy it was to achieve. You’re right that the transition effect is incredibly smooth and blends seamlessly. Thanks again for the tutorial!
No worries, glad it was some use to you 🙂
Hey Rob nice tutorial. It really works well but i want to add something. If you use Twixtor plugin you can get smoother results. Thanks again for tutorial.
Hey Rob! I’ve been trying to figure out this technique for so long! Thanks for this amazing tutorial. Much appreciated 🙂